In this tutorial, we'll build a basic math calculator using HTML, CSS, and JavaScript. We'll break down how each language contributes to the project and highlight key concepts along the way. Best of all, you can easily copy and paste the provided HTML code to use in your own project.
Let's get started building a simple math calculator using HTML, CSS, and JavaScript. We've divided the entire project into three clear sections—HTML, CSS, and JavaScript—and we'll walk you through the purpose and reasoning behind each part of the code. Open CodePen or your favorite online code editor to follow along and test the code yourself.
Math Calculator in HTML Code
<!DOCTYPE html>
<html lang="en">
<head>
  <meta charset="UTF-8">
  <title>Basic Calculator</title>
  <style>
    body {
      background-color: black;
      display: flex;
      justify-content: center;
      align-items: center;
      height: 100vh;
      font-family: Arial, sans-serif;
    }

    .calculator {
      display: grid;
      grid-template-rows: 2fr repeat(6, 1fr);
 /* top row is twice as tall */
      grid-template-columns: repeat(4, 1fr);
      gap: 10px;
      width: 320px;
      padding: 20px;
      background-color: #1a1a1a;
      border-radius: 10px;
    }

        .brandname {
          grid-column: span 4;
          background-color: #20cfcf;
          color: white;
          font-size: 20px;
          text-align: center;
          font-family: Arial, sans-serif;
          border-radius: 0 0 10px 10px;
    }

    .display {
      grid-column: span 4;
      background-color: white;
      color: black;
      font-size: 24px;
      padding: 10px;
      border: none;
      text-align: right;
      border-radius: 0px; /* squared */
    }

    button {
      font-size: 20px;
      border: none;
      cursor: pointer;
    }

    .number {
      background-color: #d1b3ff;
/* light purple */
      border-radius: 8px; /* squared-ish */
    }

    .operator {
      background-color: #20cfcf; /* teal */
      border-radius: 50px;
    }

    .clear {
      grid-column: span 4;
      background-color: #20cfcf;
      border-radius: 50px;
    }

    .equals {
      background-color: #20cfcf;
      border-radius: 50px;
    }

    button:hover {
      opacity: 0.8;
    }
  </style>
</head>
<body>

  <div class="calculator">
    <input type="text" id="display"
class="display" placeholder=
"Calculate" disabled>

    <button class="clear" onclick=
"clearDisplay()">Clear</button>
    <button class="operator" onclick=
"appendValue('/')">÷</button>

    <button class="number" onclick=
"appendValue('7')">7</button>
    <button class="number" onclick=
"appendValue('8')">8</button>
    <button class="number" onclick=
"appendValue('9')">9</button>
    <button class="operator" onclick=
"appendValue('*')">×</button>

    <button class="number" onclick=
"appendValue('4')">4</button>
    <button class="number" onclick=
"appendValue('5')">5</button>
    <button class="number" onclick=
"appendValue('6')">6</button>
    <button class="operator" onclick=
"appendValue('-')">−</button>

    <button class="number" onclick=
"appendValue('1')">1</button>
    <button class="number" onclick=
"appendValue('2')">2</button>
    <button class="number" onclick=
"appendValue('3')">3</button>
    <button class="operator" onclick=
"appendValue('+')">+</button>

    <button class="number" onclick=
"appendValue('0')">0</button>
    <button class="number" onclick=
"appendValue('.')">.</button>
    <button class="equals" onclick=
"calculate()">=</button>
    <div class="brandname">
PushCodeFar.com</div>
  </div>

  <script>
    const display =
 document.getElementById('display');

    function appendValue(value) {
      display.value += value;
    }

    function clearDisplay() {
      display.value = '';
    }

    function calculate() {
      try {
        display.value = eval(display.value);
      } catch {
        display.value = 'Error';
      }
    }
  </script>

</body>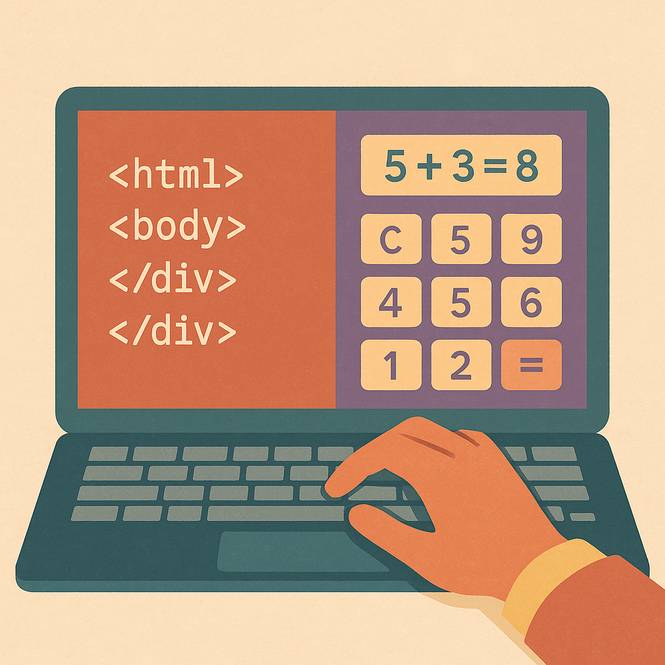
</html>Screenshot of the HTML Math Calculator

The above screenshot is how the final project looks once it's complete. Check out the button colors, shapes, and sizes. Also, at the bottom of the calculator, we inserted our brand name for a unique look.
HTML Section
<!DOCTYPE html>
<html lang="en">
<head>
<meta charset="UTF-8">
<title>Basic Calculator</title>
<link rel="stylesheet" href="style.css">
</head>
<body>
<div class="calculator">
<input type="text" id="display" class="display" placeholder="Calculate" disabled>
<button class="clear" onclick="clearDisplay()">Clear</button>
<button class="operator" onclick="appendValue('/')">÷</button>
<button class="number" onclick="appendValue('7')">7</button>
<button class="number" onclick="appendValue('8')">8</button>
<button class="number" onclick="appendValue('9')">9</button>
<button class="operator" onclick="appendValue('*')">×</button>
<button class="number" onclick="appendValue('4')">4</button>
<button class="number" onclick="appendValue('5')">5</button>
<button class="number" onclick="appendValue('6')">6</button>
<button class="operator" onclick="appendValue('-')">−</button>
<button class="number" onclick="appendValue('1')">1</button>
<button class="number" onclick="appendValue('2')">2</button>
<button class="number" onclick="appendValue('3')">3</button>
<button class="operator" onclick="appendValue('+')">+</button>
<button class="number" onclick="appendValue('0')">0</button>
<button class="number" onclick="appendValue('.')">.</button>
<button class="equals" onclick="calculate()">=</button>
<div class="brandname">PushCodeFar.com</div>
</div>
<script src="script.js"></script>
</body>
</html>
HTML Calculator Structure Explained
We want you to focus on the CSS link structure that goes on the top head section.
<head>
<meta charset="UTF-8">
<title>Basic Calculator</title>
<link rel="stylesheet" href="style.css">
</head>
This is how you establish a connection with your CSS style sheet. Now moving forward, in between the <body> tags we created a <div> named "Calculator".
<div class="calculator"></div>
That div is the container that holds all of your buttons and other HTML elements together to form the entire calculator. When naming your calculator, you can name it something simple like "mathcalc".
Next up is the input type, this is a key HTML component you should study.
<input type="text" id="display" class="display" placeholder="Calculate" disabled>
Going from left to right, what type of input do we want? We want to display a placeholder in text that says "Calculate". The disabled part means that users can't edit or change the text.
Our next HTML element are the buttons. We have 4 different button classes in this project. This calculator uses buttons for user input. Let's take a look at each button class to learn what each one does.
- <button class="clear" onclick="clearDisplay()">Clear</button>
- <button class="operator" onclick="appendValue('/')">÷</button>
- <button class="number" onclick="appendValue('7')">7</button>
- <button class="equals" onclick="calculate()">=</button>
Also, with these buttons, they have 3 different types of JavaScript functions or actions that happen when you click a button.
- onclick="clearDisplay()"
- onclick="appendValue('/')"
- onclick="calculate()"
For branding reasons, we created the PushCodeFar.com logo at the bottom of the calculator like this:
<div class="brandname">PushCodeFar.com</div>
Try adding your own brand name to make it different from other online calculators. Finally, before closing the body tags, we need to place our JavaScript link at the bottom.
<script src="script.js"></script>
This is the best place to add your JavaScript code because it lets the HTML and CSS code execute first to render the page properly. Study the math calculator structure carefully to fully understand how all code ties together. This is your foundation and it must be solid.
CSS Section
body {
background-color: black;
display: flex;
justify-content: center;
align-items: center;
height: 100vh;
font-family: Arial, sans-serif;
}
The body style defines how the entire calculator will look as a whole. Pay special attention to the display element. The display uses a flex box to show the finished calculations. Unlike the inside of the calculator that uses the CSS grid property for the buttons, the Flex box is a better fit for the display.
.calculator {
display: grid;
grid-template-rows: 2fr repeat(6, 1fr);
grid-template-columns: repeat(4, 1fr);
gap: 10px;
width: 320px;
padding: 20px;
background-color: #1a1a1a;
border-radius: 10px;
}
The calculator style uses the CSS grid property to create rows and columns for the calculator. The gap property is important here because it allows us to add some spaces between rows and columns.
.brandname {
grid-column: span 4;
background-color: #20cfcf;
color: white;
font-size: 20px;
text-align: center;
font-family: Arial, sans-serif;
border-radius: 0 0 10px 10px;
}
The brandname CSS style is our own custom-built style. It uses the grid-column property to expand across all four columns. The brandname div sits at the last row of the calculator. We gave it a cool looking border-radius so it could stand out.
.display {
grid-column: span 4;
background-color: white;
color: black;
font-size: 24px;
padding: 10px;
border: none;
text-align: right;
border-radius: 0px;
}
Similar to the brandname style, the display style uses the grid-column property that expands across four columns.
button {
font-size: 20px;
border: none;
cursor: pointer;
}
The button style uses the cursor pointer property to display a finger when hovering over calculator buttons.
.number {
background-color: #d1b3ff;
border-radius: 8px;
}
.operator {
background-color: #20cfcf;
border-radius: 50px;
}
.clear {
grid-column: span 4;
background-color: #20cfcf;
border-radius: 50px;
}
.equals {
background-color: #20cfcf;
border-radius: 50px;
}
button:hover {
opacity: 0.8;
}
JavaScript Section
const display = document.getElementById('display');
function appendValue(value) {
display.value += value;
}
function clearDisplay() {
display.value = '';
}
function calculate() {
try {
display.value = eval(display.value);
} catch {
display.value = 'Error';
}
}
JavaScript Calculator Structure Explained
For our const display code, all operations or calculations will be directly performed on the 'display' property. This is like the chalk board in a classroom where the calculations are performed.
The function appendValue works when a user clicks a number (9) or an operator (+) on the calculator, it displays it on the top display box or the chalk board like 9+9.
To perform the 9+9 calculation, we use the function calculate to get the final results. When the user clicks on the (=) button, it performs calculations and displays the result on top inside the white display box or using our analogy the chalk board, 18.
Once the user is finished calculating, they may want to clear the display box or chalk board. We use the function clearDisplay to erase the display box or chalk board.
A.I. Prompt to Create a Math Calculator
A.I. Math Calculator Prompt
You are an AI assistant that
writes clean, responsive
HTML/CSS/JavaScript for
a basic on-page calculator.
Study the example below
and then generate your own
version that matches its overall
layout, styling palette, and
functionality—but do not copy
it exactly. Change class names,
tweak colors, adjust sizes, and
reorganize the grid definitions
while keeping the same core features.

Example to reference (do not
reproduce verbatim):
```html
<!DOCTYPE html>
<html lang="en">
<head>
  <meta charset="UTF-8">
  <title>Basic Calculator</title>
  <style>
    body {
      background-color: black;
      display: flex;
      justify-content: center;
      align-items: center;
      height: 100vh;
      font-family: Arial, sans-serif;
    }

    .calculator {
      display: grid;
      grid-template-rows: 2fr repeat(6, 1fr);
      grid-template-columns: repeat(4, 1fr);
      gap: 10px;
      width: 320px;
      padding: 20px;
      background-color: #1a1a1a;
      border-radius: 10px;
    }
    /* …additional styles… */
  </style>
</head>
<body>
  <div class="calculator">
    <input id="display" class=
"display" disabled placeholder=
"Calculate">
    <button class="clear" onclick=
"clearDisplay()">Clear</button>
    <button class="operator" onclick=
"appendValue('/')">÷</button>
    <!-- …number and operator buttons… -->
    <div class="brandname">
PushCodeFar.com</div>
  </div>
  <script>
    const display =
document.getElementById('display');
    function appendValue(v) { display.value += v; }
    function clearDisplay() { display.value = ''; }
    function calculate() {
      try { display.value = eval(display.value); }
      catch { display.value = 'Error'; }
    }
  </script>
</body>
</html>
With the AI prompt above, you’ll build a web-based calculator inspired by the example project. Feel free to introduce additional HTML elements, custom CSS styles, or extra JavaScript functionality to give your version its own unique touch.
How we Built it this Way
The easiest way to start creating your own HTML calculator is by sketching a simple layout in a notebook. Translating the idea from your head to paper helps you visualize and organize the structure more effectively.
Begin by sketching the outer frame of the calculator, and then work inward toward the core functionality. Plan out how many rows and columns you'll need — in our example, we used 6 rows and 4 columns to accommodate the display, buttons, and other interface elements.
Start from the top of your layout:
-
Add the display area first
-
Then sketch the buttons
-
Finish with your brand name or logo at the bottom
Once you're happy with the structure, move on to writing the HTML to match your sketch. After the HTML is in place, you can style your calculator using CSS. We wanted ours to stand out, so we customized it with brand colors, hover effects, and varied button shapes and sizes to give it a distinctive look.
All of these design decisions — from layout to styling — can be explored on paper first to save time and clarify your approach.
Finally, the JavaScript ties everything together. It brings your calculator to life by enabling the actual math operations and user interactions. Think of it as the engine powering the interface you've built with HTML and CSS.
Conclusion
The whole coding idea is simple, start by sketching your project. This way you get a bird's eye view of all the HTML elements first. Then, the fun begins, style your calculator with CSS the way that fits your company's brand or personal tastes. Try different layouts, like adding more columns or rows.
Add some stylish colors with shades to make your buttons pop out. Grab some colored pencils and add colors to your final sketch. Finally, add the JavaScript code necessary to run your math calculator. Remember, you already have the base code here, now it's time for you to get creative. If you need help or have questions, feel free to leave them below.